This chapter introduces the player to building, managing Food matters, how to use the emergency services properly and their roles.
This chapter of the campaign teaches the player how to how to manage the Needs of your prisoners by building a Kitchen, a Canteen, a Common Room, and a Laundry, and how to fight contraband and addictions.
Walkthrough[]
| If you have the Going Green DLC installed, remove the Drink Machine from the Infirmary as soon as possible, as it is a source of Drinks; if left unchecked you will end up with the whole prisoner population brewing Booze in their cells.
Another thing you might want to do is to go in the Reports (the clipboard icon in the bottom right corner of the screen), select the Intake tab and click on 'Closed' or 'Fill Capacity', to avoid having too many prisoners delivered to you. Lastly, if the power runs out at any time of the campaign, remember to add more Capacitors to the Power Station in the bottom right corner of the map. Then turn the station back on. |
A massive fire has destroyed this prison's kitchen and canteen. If we don't find a way to feed the inmates quickly, we'll have a full-scale riot on our hands. Solve the food crisis then rebuild the Kitchen and Canteen.
The chapter just started and there's a huge fire in the kitchen! The CEO will soon contact you.
The CEO: "There's a crisis brewing at one of our other facilities. Someone's started a fire in the prison kitchen. The priority is to put it out, stop any casualties and prevent more damage. Use the Emergency Service button in the toolbar to call the fire brigade. Get this fire under control before it burns the whole prison down!"
|
Open the Emergencies menu and click on 'Fire Engine' to call a squad of Firemen - or two squads if you want; they will quickly arrive by the road on the right side of the map. Drag and select them from the map, or use their icons on the right side of the screen; once selected, right click near the burning buildings to order your Firemen to move there; Firemen will aim their hoses at any nearby fire automatically, or you can select a Fireman and press H to aim their hoses manually. Move them around until all the flames are extinguished.
| The fire will stay contained within those burning buildings even if you don't tend to it, so no need to rush; besides, you'll have to demolish the remaining buildings anyway even if you manage to leave most of them intact. |
| Mind you that Firemen are not fire-proof! When you order them to move, be careful not to make them walk straight into the fire! |
Once the flames are extinguished, a cutscene will show you a survivor emerging from the burned building.
The CEO: "My God, there's a survivor in the wreckage. Christ on a crutch, it's Don Palermo. Of all the inmates it just had to be our mob boss. The bad news for him is that budget cuts have meant we had to sack all our permanent doctors. The good news is, our Infirmary is still usable. Hire a couple of Doctors and they'll take care of Don Palermo whilst we sort this mess out. We need to clear this mess. Use the bulldoze tool to demolish the ruined canteen and kitchen. You need to remove all the debris. Designate a Garbage Zone adjacent to the road. Our workmen will dump the wreckage there for the garbage trucks to dispose of. Finally, can you send those firemen home now that they've done their job. I've added more details on each of these objectives into your todo list. Any time you're unsure what to do, highlight the objective and you'll see additional instructions."
One thing at a time. First thing off, dismiss the Firemen by clicking on the red X on their blue icon on the right side of the screen, and they will collect their hoses and leave on their fire engine.
Open the Staff menu and select 'Doctor' then click on the map to hire two of them (to facilitate their work, locate the Infirmary in the bottom left corner of the map and hire them inside it). In a similar way, you can select 'Workman' and hire 9 of them for a total of 30 to complete the optional objective.
Designate a Garbage Zone by opening the Rooms menu and selecting 'Garbage'; the correct area is highlighted near the road.
Now you can deal with the wreckage. Open the Foundations menu, select 'Bulldoze', then select the burnt kitchen and canteen to demolish them to the ground.
| Normally you should try to save up money in these situations, and dismantle any object that can still be savaged to sell it for a small refund or keep it for later use. But you have plenty of money right now, so don't worry about it. |
The CEO: "Demolishing those buildings will take a while. You can pass the time more quickly by using the buttons under the clock."
Don't mind your prisoners for now: they are complaining because they are hungry, but they'll soon have a new canteen.
Once everything is done, you'll receive a new call for the CEO and a cutscene will start in the Infirmary. You'll see Don Palermo gravely injured on a Medical Bed, together with his son Sonny Palermo and her daughter's husband Nico Tamoretti. The wounded man, despite believing one of them to be the arsonist, will leave the Palermo name in their hands.
The CEO: "Without food, these inmates will be tearing the walls down within a couple of days. We've got to secure the prison before we end up with a riot on out hands."
The Deployment mode is activated, which can be accessed by opening the Deployment menu.
The CEO: "This is the Deployment screen. From here you can control the tactical deployment of all your guards. Deploy a spread of guards to all cell blocks and rooms. Assign 10 guards to stations around the prison. That should be a sufficient show of strength for now. I also want a patrol around the inner courtyard where we will be building the new facilities.
|
To deploy a Guard, open the Deployment menu, select 'Assign Guards', then click within a sector to create a station. A Guard, if available, will be automatically assigned to that station. A good idea would be to assign two guards to every cell block, for a total of 10.
You can check whether a station is occupied by a Guard from the color of the station icon.


The icon of a Guard Station - occupied on the left and vacant on the right
To create a patrol, click on the 'Patrols' tab in the Deployment menu, then select 'Blue Patrol'. Click and drag to draw your patrol routes. To assign a Guard to a patrol, click on 'Assign Guards' on the 'Patrols' tab and click again on the patrol route. You can create a patrol route anywhere in the inner courtyard. then assign 2 Guards to it.
Guards cast an invisible 'security' aura around them, that makes the prisoners caught in it less likely to misbehave.
| Different colored patrol routes allow you to overlap and assign Guards to them separately. You can create multiple patrols of the same color, as Guards won't mix them up as long as they do not overlap each other. This means that you don't need to use patrols of different colors unless they overlap each other. |
| Keep in mind that Guards assigned to a sector or to a patrol won't leave their position to take other jobs. For example, a Guard assigned to a Reception won't take care of the new inmates getting off the bus, and a Guard patrolling in a cell block won't leave their job to escort a prisoner to a Solitary Cell. The only things they are allowed to do when stationed or patrolling are opening doors and responding to a violent attack from a prisoner. |
The CEO: "We've a lot of work still to do. We need to turn our attention to replacing the kitchen and canteen. First, we need to rebuild the kitchen. You'll need to install several pieces of equipment, and hire some chefs. Once that's done, build a new canteen. Once you have all that completed, the chefs will automatically start preparing meals for the entire prison.
| The objective info about "approx 12m sq" means "a square of side 12m" (and NOT 12m2). The same goes for 20m sq. |
Let's start from the Kitchen. Build the Foundations (indicative shape: a square of side 12m) and add some doors to it (you can use Staff Doors to make it a bit more secure). Once it's ready, designate it as 'Kitchen' in the Rooms menu. In the Objects menu you can find the required furniture:
- at least 4 Cookers, used by the Cooks to cook prisoners' meals;
- at least 4 Fridges, used to store the ingredients used to prepare the meals;
- a Sink, used to clean dirty Food Trays;
- a Bin, used to dispose of the leftovers.
You can add some Lights too, even if it's not required.
Cookers and Fridges are High Powered, so they need their own Electrical Cable; the Sink on the other hand has to be connected to a Water Pump Station via pipes. Similarly to how you lay down cables, open the Utilities menu: in Utilities mode you can also see water pipes and the water that is flowing inside. On the bottom right corner of the map you can locate the Water Pump Station. The general rule is that you use the Large Pipes to carry water to the main buildings and then you distribute it to the single objects with Small Pipes.
| Large Pipes keep the pressure high enough for the water to travel more than 700m away from the Water Pump Station, however they are expensive and prisoners digging an Escape Tunnel can use them to move underground more quickly; Small Pipes are very cheap (just $2 each), and they don't aid escaping prisoners as much as the large ones, however the water pressure lowers quickly inside them, so you can't use them too far from a main Large Pipe. |
There should be a Large Pipe running not far away from your Kitchen. Locate it, extend it next to the building if it's not close enough, then use Small Pipes to link it to the Sink. To complete the optional objective, add some floor tiles from the Flooring menu (e.g. Checkered Floor).
Now it's time to build the Canteen: build larger foundations (indicative shape: a square of side 20m) and add a door - you can use a couple of normal Doors so that prisoners can enter the building from more sides. Designate it as Canteen from the Rooms menu, then add the required furniture:
- 2 Serving Tables, used to store the meals cooked by the Cooks in the Kitchen;
- at least 6 Tables, used by the prisoners to place their Food Trays while eating;
- 2 Benches around each Table, used by the prisoners to sit on while eating;
- a Bin, used to quickly dispose of leftovers.
You can add some Lights too, even if it's not required.
If you want to complete the optional objective, add some floor tiles from the Flooring menu (e.g. Checkered Floor).
| Prisoners don't actually need Tables to eat, they only need to sit down on Benches. If there is no room for more Tables but you still want all of your prisoners to eat at the same time, replace some Tables with more Benches (remember you have to keep at least one Table in the room for the Room requirements). |
| You will likely have protesting prisoners running around while you build the two facilities. Ignore them for now, as they are harmless in this campaign. |
This is an example of how the area could look like once you're done:
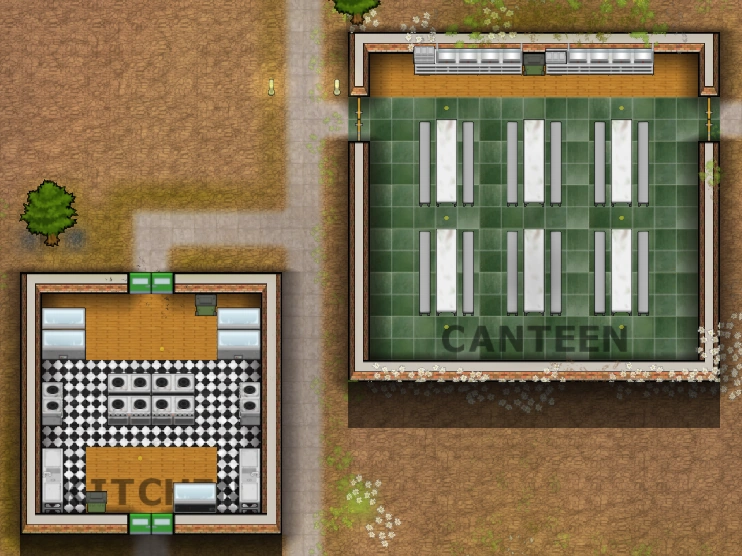

Remember to hire the 8 Cooks to complete your Todo list.
The CEO: "You would not believe what I've just been told. Our guys were dumping some of the old food stuffs. They discovered packs of narcotics and bottles of alcohol hidden in the crates. We'd suspected the Palermo family of smuggling into the facility for some time now, but we'd never been able to determine how. Some days it doesn't just rain, it pours."
The CEO will then tell you more about the Palermo family, and how the eldest son of the Don, Anthony Palermo, was the guy Edward shot in bed with his wife during the first chapter of the campaign. On the crime scene, the police found narcotics stashed in Anthony's bag and arrested the whole family, aside from Vitalia, the Don's only daughter, who has been kept out of the narcotic trades business.
The CEO: "We could have quite a serious narcotics problem on out hands here. But we can't deal with that yet. We've got our kitchen and canteen up and running. Our chefs will work on preparing food for everyone, which should cool things down. I'm concerned that the fire was clearly deliberate, and we don't want a repeat of that. Install a sprinkler system over the new kitchen and canteen and connect them to the water mains."
The CEO: "All prisoners have needs. Those needs directly impact how your prisoners behave. Right now, everyone is starving hungry, and that's all the shouting has been about. Food is one of their highest priority needs, and you ignore it at your peril. A prison is just a few failed meals away from a wall to wall riot. You can monitor the needs of all your prisoners from the Needs Report, which you can normally access through the Reports icon in the bottom right."
The CEO opens your Reports on the Needs tab.
The CEO: "This report shows the combined needs of all your prisoners. Red means a lot of prisoners are angry about this particular need not being met. As you'd expect, Food is red for virtually everyone. But these prisoners are also very bored (Recreation need), and the prison is in a pretty shabby state which is reflected in their Environment and Clothing needs. It's your decision, as the resident prison architect, which needs you will try to attend first. You could install televisions in their cells to keep them occupied, and hire some Janitors to clean the place up. Or you can just ignore your prisoners needs altogether, and rely on force to keep your prison under control. I'll leave it up to you."
|
You can find the Sprinkler in the Objects menu; when inside a building, they are installed on the ceiling, so you can place them over any existing object. Place two in the Kitchen and two in the Canteen, then connect them to the water mains using Small Pipes through the Utilities menu.
As soon as you complete the first objective, the CEO will call you with news:
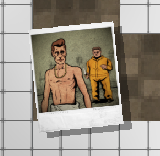
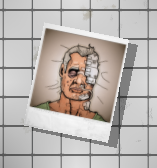
The CEO: "We've had an incident in the showers. There's a body. Actually, there's two bodies. Luckily for us, we've got cameras in there. When you get a moment, click on the Polaroid in the Showers and we'll take a look at what happened."
|
If you don't want to deal with the optional objectives, you can skip this part and just click on the polaroid in the Shower room in the the upper left corner of the map. Else, let's take care of the prisoners' Needs.
We have operational Kitchen and Canteen, so the Food need should lower down on its own as soon as the prisoners eat during the next Eat regime.
To lower your prisoners' Recreation need you have to install specific objects which reduce it: a Radio does that slowly as long as the prisoner is in the room containing it, while a TV requires seating in front of it to have any effect; a Pool Table is very effective, but can only satisfy the need of two prisoners at a time.
One of the easiest way to proceed is to install a few Large TVs facing the Tables in the Canteen: this way, they can just stay there and watch TV once they have finished their meal. Another way is to install a Radio in every cell, so that their Recreation need is slowly lowered while they sleep or are locked up; or a TV instead of a Radio so they can sit on their bed and watch it whenever they are free. It's up to you.
| Adding extra objects to the Canteen is a useful strategy to avoid having prisoners doing nothing while waiting for the Eat regime to end: Toilets for Bladder and Bowel, Shower Heads for Hygiene, TVs for Recreation, Prayer Mats for Spirituality, Gym Mats for Exercise, Phone Booths for Family and Bookshelves for Literature are the most common ones. |
To deal with the Environment need, hire a bunch of Janitors from the Staff menu; the prison is very dirty, 10 of them should be able to clean it quickly.
Once all the optional objectives are completed (wait for the next Eat regime if the Food need is still too high), the CEO will call to congratulate with you.
The CEO: "You've shown an admirable dedication in taking care of your prisoners needs. Well done. You'll probably have noticed by now that the major remaining gripe amongst prisoners is the lack of clean clothing. If you want to take care of this need as well, you'll need to run a laundry service to gradually provide all your inmates with clean clothing. Build a laundry and hire more janitors to start providing clean laundry to our inmates."
If you hired 10 Janitors to handle the Environment need, the second objective is completed already (if you haven't, do it now).
Pick a central area of the prison to build a Laundry, so that it can easily supply clean uniforms to every Cell. Build the foundations (a square of side 10m is enough), add a door, and when it's built designate it as 'Laundry' from the Rooms menu. The required objects are (the quantities are just a suggestion):
As with the other rooms, you can add Lights and a better flooring if you wish so.
The Laundry Machines need to be connected to an Electrical Cable and a Pipe to be operational. This is an example of what it could look like:
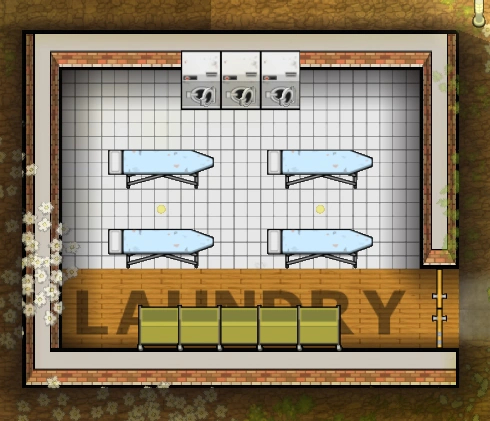

Clean uniforms will be delivered to your prison, put inside the Laundry Baskets and distributed to every Cell by your Janitors. Once your prisoners change clothes (e.g. after a Shower regime), dirty uniforms will be collected in the baskets now empty, brought to the Laundry and washed in the Laundry Machines.
Once the Clothing need has been taken care of, click on the polaroid in the Shower room on the upper left corner of the map to continue with the campaign.
You will assist to a cutscene of Sonny Palermo trying to murder Nico Tamoretti when alone in the showers. Nico will confess that the fire was his idea to kill Sonny, but Don Palermo was caught in it by mistake. Sonny will attack Nico with a knife, but Nico has hired a thug, Franky, to kill Sonny with a piano wire. As a result of the fight, both Sonny and Franky will die, and Nico will be injured and sent to the Infirmary.
The CEO: "Fantastic. Looks like the Palermo family is running out of members. You can bet the Palermo's were selling those narcotics on to every con here. The guards are telling me they've seen a lot of prisoners showing signs of withdrawal since the fire. I want you to search every prisoner and every cell. I bet we find Palermo drugs all over the prison."
|
You might have noticed quite a few of alerts of prisoners in overdose, they look like this:
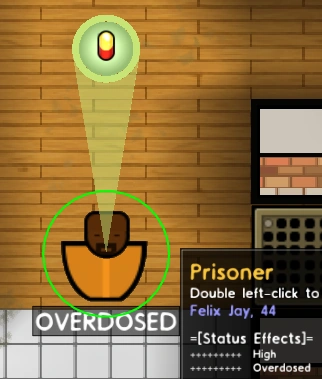

If you click on it, it will show you where such prisoner is. A Guard will automatically escort them in the Infirmary, where they will be treated by a Doctor. If they cannot be treated in time (e.g. the Infirmary is too far away, or there are no available Guards for the job) the prisoner will die of overdose.
Hire 5 more Guards from the Staff menu to complete the optional objective, then perform a Shakedown: open its menu by clicking on the red icon in the bottom right side of the screen, then click on 'ALL Sectors'. This will order an immediate search of all Rooms and Prisoners.
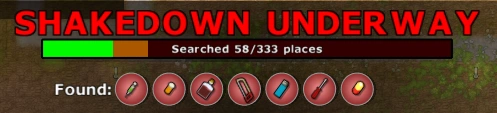
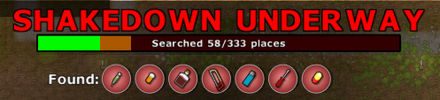
You can monitor the Shakedown from the specific tab in the top half of the screen; your Guards are going to find plenty of contraband. The CEO will call you as soon as you find enough narcotics, and if you want you can interrupt the Shakedown at that point by clicking on 'Stop ALL' from the Shakedown menu.
If you have the Going Green DLC installed and you haven't removed the Drink Machine in the Infirmary early on, your Guards will find A LOT more contraband.
|
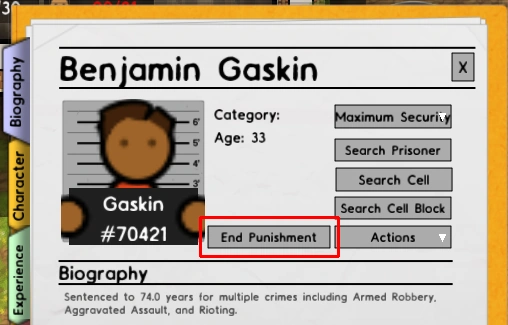
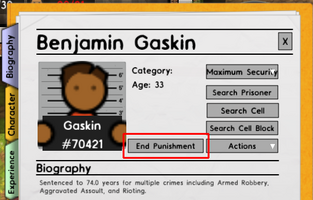
| Many of those found with contraband will be assigned to a Solitary Cell to spend some time in there as a punishment. The problem is that in this prison there are only 4 Solitary Cells. This means many prisoners will be kept 'on hold' shackled somewhere waiting for a Solitary Cell to free up. Shackled prisoners are stuck in place and cannot tend to their needs. If you have too many of them waiting, you might want to end their punishment so they can resume their prison life. To do so, click on the shackled prisoners individually to open their Prisoner Profile and then click on 'End Punishment'. |
The CEO: "On the positive, it's not as bas as it could have been, but there are definite problems with drug and alcohol dependency. We need to help these men. It's the only way of curbing their activities and dealing with their symptoms. Start a drug treatment program in the infirmary. Our Doctors will administer a chemical substitute that will help alleviate the cravings in our addicts. For the alcoholics, there isn't a chemical substitute, so I suggest we start group therapy sessions. You'll have to build a new Common Room to run those meetings. To start new Programs, go to 'Reports' in the bottom right of the screen, then 'Programs'."
|
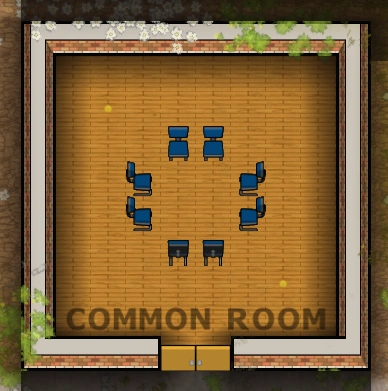
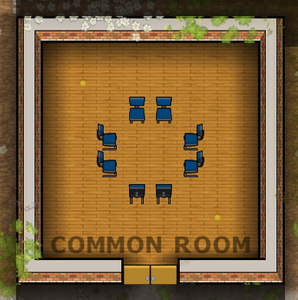
Find a suitable spot in the inner courtyard of the prison and build the foundations for the Common Room (a square of side 10m is enough), add a Door and then designate it as 'Common Room' through the Rooms menu. Once it's built, add 8 Chairs (and some Lights if you want to, with the relative cables). This is an example:
| Since prisoners like to hang around it whenever they can, the Common Room is a good place where to focus all those objects that cater for some needs: TVs and games for Recreation, Chairs or Sofas for Comfort, Toilets and Shower Heads for Bladder, Bowels and Hygiene, Gym Mats for Exercise, Bookshelves or Computer Stations for Literature, Prayer Mats for Spirituality and Phone Booths for Family. |
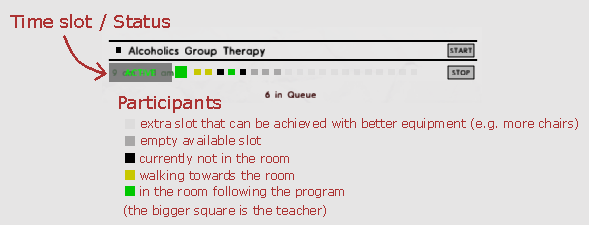
Now it's time to start the Reform Programs: open your Reports (click on the clipboard on the bottom right corner of the screen), then select the 'Program' tab. Here you can see a list of all the programs you can run, their details, and how many prisoners are currently interested in them.
Locate 'Alcoholics Group Therapy' and schedule a meeting for it by clicking on 'START'. You'll notice that the program has now moved at the top of the list and says 'NO REGIME TIMESLOT' in red. This happened because prisoners can only follow programs during Work/Lockup or Work/FreeTime regime hours, and at the moment your Regime has none.
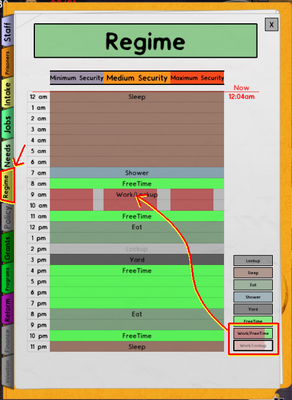
To fix this, select the Regime tab of your Reports. Select either Work/FreeTime or Work/Lockup from the list on the bottom right, then click on the middle of two consecutive time slots of your choice. Here is an example:

If you have more Risk Categories like in this case, you can run different regimes for each of them. When selecting a regime, click in the respective column to split the time slot in more segments.

If you click on the red cross over the risk category, the relative regime will be overwritten by the Medium Security one, which is considered as standard. |
Now you can go back in the 'Programs' tab of the Regime and click on 'Reschedule All Programs' in the bottom right corner of the tab. You should see a time slot for the program (in the example, 9am - 11am) and a few slots being taken by the prisoners. Do the same for the 'Pharmacological Treatment of Drug Addiction' program. Note that since they require two different rooms they can run simultaneously.
The CEO: "Very good. We've made a real difference here, and I think the prison is back under control. You can stay and improve the prison further, or we can move on to the next facility. When you are ready to move on, click on the Polaroid in the Infirmary.
Reasons why prisoners do not follow reform programs:
|
| If the optional objective about the drug addicts doesn't get completed, it's because the Infirmary is located on a corner of the map and most inmates only spend a bunch of seconds inside instead of a full hour, thus failing the program. You can fix this by adding a 'FreeTime' regime hour before the work regime so that the prisoners have the time to walk to the Infirmary in time for the program to start. You can also add more Medical Beds to the Infirmary (up to a total of 8) to speed up the process. |
In the new cutscene you will see Vitalia Palermo visiting his husband Nico in the Infirmary just to tell him she just divorced from him and took the lead of the family.
NOTES[]
An issue having Janitors delivering clean uniforms stuck in the walls has been fixed with "THE TOWER" update.
Gallery:[]
")
")
")
")
")
")
")
")
")
")
")
")
")
")
")